Blog

Tick Control: Minimizing Ticks in Your Home

Many people think that in the winter months that you are safe from tick bites. Unfortunately, ticks can be active anytime it’s above freezing. Furthermore, if you have sunny spots in your yard, that can create a microclimate and as a result, ticks can be active even if the air temperatures are well below freezing.

So, what’s a homeowner to do? There are a few landscaping practices that can help to minimize a tick-friendly environment

First, keeping your lawn mowed and your beds free of leaf litter helps reduce areas for ticks to rehydrate, live and breed. (Deer ticks are often found in such areas, as they require a high humidity to survive.) 

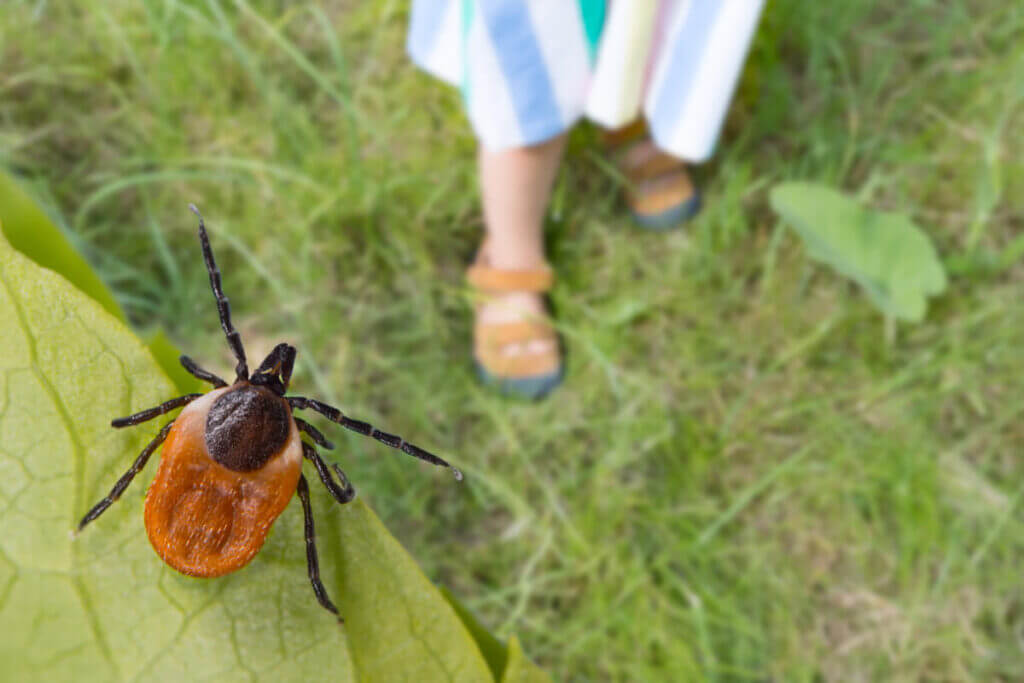
The black-legged tick also known as the deer tick, is the smallest of the ticks we find here in New York and primarily feeds on deer and humans. This tick is the only vector of Lyme disease but also carries babesiosis, anaplasmosis and Powassen virus.

If you have areas on your property that are bordered by a woodland or wild areas, creating a mulch barrier between the wooded/wild area and your lawn will help deter tick movement. Some recommend the use of cedar mulch as ticks do not like the smell, however the mulch will most likely need to be put down on a yearly basis and can become costly. Another option for the barrier is to use gravel or stones. Keeping play sets in sunny areas and plantings trimmed around walkways is also helpful.

Similarly, pruning trees and/or shrubs if they are overgrown or have low-hanging branches as well as pruning to allow more sunlight to filter through their canopies also helps to reduce the habitats ticks enjoy.

The next practice involves installing a deer fence around your property or invest in deer repellent services. Keeping deer off the property ensures vulnerable plants aren’t damaged and prevents ticks from being carried onto your property by the deer. It is also recommended that fencing be installed around vegetable gardens to prevent deer, rabbits, and other critters from browsing and bringing ticks to your landscape.

One of the biggest carriers of ticks are rodents, especially mice. Place woodpiles far away from areas where your family and pets will frequent. Also, bird feeders can be an attractant for mice if the fallen seed isn’t cleaned up regularly.

Using these landscaping tips will help to deter some of the environmental influences that can affect the number of ticks and how well they survive in your landscape.

If you’re interested in tick control services, contact Organically Green today.

When Should You Start Preventative Tick Spraying For Your Home?

Ticks are among the most widely hated pests for Long Islanders, without question. They can wreak havoc on lawns and gardens. They are parasites that feed on humans, pets, and wildlife, feasting on pets, children and beyond. But when it comes to using tick spray for your home, most people (understandably) don’t know when to start.

The best rule of thumb is to begin using tick spray for your home in the early-to-mid spring, as this is the time when female ticks start laying their eggs please adjust this as different tick species lay their eggs at different times and also ticks can be active any time it’s above freezing, so for example if the weather warms up quickly we can be spraying by the 1st of March. When it comes to situations like this, it’s always ideal to be proactive, whenever possible because the sooner you can work towards preventing ticks, the better off you are. That’s why we recommend spraying at minimum every 4 weeks.  

Most importantly, you’ll want to wait until there is no more snow on the ground, which it usually is in spring, but these days, you never know. So when in doubt, consider spraying early and continuously.

This guide covers most of what you’ll need to know when using tick spray for your home, but the truth is, there are outside factors that can affect your total outcome. If you feel uncertain, you’re not alone. That’s why Long Islanders turn to the professionals at Organically Green. We use only the latest, most up-to-date practices to ensure nothing short of the best results. 

If you’d prefer to leave home tick spray to the professionals, then feel free to contact us here or call us at 631-467-7999 to schedule an appointment today!

Keep Your Trees and Shrubs Healthy With Deep Root Fertilization

Your trees and shrubs are the focal points of your personal oasis and the foundation to which you can build your dream around. With that said, it’s in any homeowner’s best interest to keep them healthy and well-maintained. The professional’s best advice? Using Organically Green’s deep root fertilization program.

This state-of-the-art organic fertilization program is specially designed to ensure the overall short and long-term health of your trees and shrubs. The professionals at Organically Green use organic liquid fertilizers that are fortified with the essential nutrients your plants require for optimal growth and development. We also utilize different kinds of beneficial fungi, which work to increase the update of the root systems, all working towards the same goal of long-term prosperity. Think of the deep root fertilization program like a long-lasting multivitamin for your trees and shrubs!

Show Your Plants The Individual Attention They Deserve

Since plants tend to differ in several ways, they don’t all require the same level (or kind) of care. As an example, plants such as rhododendrons and hollies often prefer an acidic soil, which calls for granular fertilizer that meets their specific needs. There is simply no way around this and when it comes right down to it, plants can only thrive as well as their surrounding environment allows them to.

If you suspect that your plants may require organic deep root fertilization, then Organically Green is the place for you! As Long Island’s preferred source for horticultural services, you can trust that our professionals will identify and treat any and all problems surrounding your garden.

Contact us here or call us at 631-467-7999 to schedule an appointment today!

Prepare Your Garden for Spring

It’s finally that time of year! Spring is almost here! It’s time to prepare your garden for another growing season. 

Hopefully, through the winter you’ve been staying on top of things like deadheading and pruning that way you have a head start on cleanup tasks, but if you haven’t now is the time to start!

Remove old flower heads from perennial plants, living weeds, damaged branches, and older mulch and grass clippings. Most of these things can be placed in a compost heap to become incorporated into the soil. If it is already well-composted in place you can use organic matter to work into the soil and increase nutrient levels. You want to expose the soil so you can prepare it for flowers and other plants. 

At this point you can add an organic fertilizer along with the older mulch, working the soil until it’s all mixed in. This will ready the garden bed for spring planting, and giving it the nutrients it needs to support your flowers and vegetables. This will also help to loosen up the soil which is important after being compacted all winter long. While you’re digging up the soil, it’s the perfect time to perform a soil test to see what your pH levels are and whether or not you need to make adjustments. Your local cooperative extension can help with this. 

If you’re going to be using raised bed planters early spring is a good time to purchase soil specifically formulated for raised beds. While it may be too early to plant most crops, being prepared for warmer weather never hurts. If you decide to plant cool weather crops like lettuce, asparagus, and Brussel sprouts, be sure to cover crops with a frost protectant on nights that may still be extremely cold. 

Finally, once you’ve gotten your beds prepared and your garden ready for next month’s planting you can spend some time dividing up perennials—like bearded iris, hostas, and daylilies. These perennials can often begin to crowd each other out over time, causing their blooms to get smaller and more sparse as time goes on. By splitting them you give them more room to grow. The most important thing to remember with splitting plants is that your garden tools must be sterilized with alcohol first. You can spread disease and pests from one plant to another if you don’t keep your tools clean. 

When Do I Start Mowing My Lawn?

Spring is coming and your lawn is getting ready to wake up from the long winter. But when is the best time to start mowing your lawn? The best time to mow your lawn is in early spring after the risk of frost has passed. You don’t want to shock your grass’s new growth by cutting too quickly. 

Once you’re sure the risk of frost has passed, before you mow, it’s important to prepare your lawn for the season. Applying a weed and feed fertilizer as part of your lawn care is a good idea before any mowing happens. Just remember to wait until after April 1, as it is illegal in Nassau and Suffolk counties to apply fertilizer before then. 

Once it’s warmed up, you’ve fed and put down weed control, and your lawn has started growing in earnest, it’s time to get your mower ready. When the grass has grown at least two inches tall it should be safe to cut. This helps to protect the roots. Make sure your blade is sharpened and adjusted so that you’re never cutting more than a third of its length in any single cutting. This will help the lawn grow lush and strong. Depending on your type of grass, as a rule of thumb, you should let the lawn reach 2–3” in length. 

To help return nutrients to your lawn it’s another good idea to leave some of the clippings where they fall so that they can decompose and release nitrogen. 

Finally, don’t water your “new” lawn right away. Wait until the heat arrives to wilt the lawn a bit. This will tell the roots to grow deeper which will help them to survive the heat later in the summer. 

Hay Bale Gardening

Hay bale gardening, or straw bale gardening—as it should be called—is a great way to make your growing season easy and plentiful. They’re an alternative to using raised beds and they’re great for growing vegetables such as tomatoes, peppers, squash, zucchini, cucumbers, and strawberries with little to no effort on your part. Hay bales are a wonderful growing medium; though corn, potatoes, and sweet potatoes aren’t a great choice for straw bales. 

Before you start your straw bale garden it’s important to choose a location. Pick a sunny spot that’s near a water source or within reach of your hose. Once you start your garden it will be impossible to move due to the weight, so choose carefully. 

Next, you’ll want to source your straw bale. Your local garden centers may carry straw bales, but be sure that they haven’t been treated with any chemicals and that they’re straw and not hay bales. Hay bales contain seeds that will germinate once you condition the bale, and you don’t want that. You want straw, which is the stalk of the wheat plant. Hay is generally sold as livestock feed, so ask before you buy to be sure you’re getting straw. 

After you source your bales and have a location, put down some newspaper or cardboard under your bale. This prevents weeds from growing up into the bale, so make sure it sticks out a few inches around the sides of the bale. Then it’s time to condition your bale. Once you’re done conditioning the bales you won’t be able to move it anymore, so be sure about that placement!

Conditioning the bale is next. Conditioning basically turns the bale into a compost pile. You’ll begin by watering the bale. They have to stay wet, so do this once a day. This starts the decomposition process that heats up the bale. After day 4 sprinkle the top of the bale with fertilizer, such as a cup of ammonium sulfate (21-0-0) or half a cup of urea (46-0-0). Your local garden centers can help you find these. Do this for three days. After that, cut the amounts in half and do it for 2 more days. Each day water the fertilizer into the bale to ensure it penetrates all the way through. On the 10th day stop adding fertilizer, but keep up with the watering process. 

On day 11 you’ll want to check the bale’s temperature. If it feels about the same as your hand it’s safe for planting seedlings. If not, continue watering and check it the next day. You want to make sure it’s not hot enough to cook tender young plants. 

Once the bale is conditioned you can use a small shovel or trowel to dig a hole in the top of the bale. If you are using container plants dig a hole slightly larger than the pot your plant came in. Then remove the pot, being careful not to damage the plant root, and place it in the hole you just made. Do not remove the potting soil around the plant. That should go in the hole along with the plant. Push the straw around the base of the plant to help secure it. 

And that’s it! You have your straw bale garden. The most important thing you’ll need to remember once your garden is going is that it will need to be kept constantly moist. This can be accomplished through thoroughly soaked waterings every day or through the use of a soaker hose and drip irrigation. Whichever way you choose the microbes in the straw need that moisture to survive and help your plants to grow, so be sure to help them by keeping your hay bale moist. 

Once your bale is done for the year you can take it apart and throw it into the compost pile so you can return the nutrients in it to the soil. It’s the perfect way to garden without waste. Give it a try this summer! You’ll love the results. 

January and February Gardening Tasks

Yes, it’s cold and often grey outside, but that doesn’t mean your garden chores are done for the season! Believe it or not, your garden is still a living and growing thing all through winter. Now that the days are growing longer you’ll have more time to get all of your indoor and outdoor gardening chores done. 

January and February are the months to consider doing a winter prune on your deciduous shrubs and fruit trees, before the buds pop. Trim out anything dead, diseased, or damaged. This will be easier to see now before there are any leaves on the branches. Trees and shrubs left unpruned may have fewer blooms and less growth come spring. Prune roses as well and they’ll reward you with a riot of blooms. 

It’s also a good time for planting early spring bulbs! Yes, it’s true, if you can work the soil it’s not too late to plant spring-flowering plants such as Crocus, Hyacinths, Tulips, Daffodils and more. For summer bulbs you’ll want to take a look at them and make sure none of them are rotted or collapsed. This indicates either disease or a bug infestation, so you’ll want to get rid of those before it spreads to your healthy bulbs.

Examine your perennial plants for frost heaves. This happens when the roots get exposed due to the freezing and thawing cycles of the ground. If you find them make sure the roots are properly buried and consider adding some mulch over the area to prevent future heaves. 

January and February are a good time to plant bare-root hedges, which are cheaper than pot-grown. These should become available toward the end of February, so think about digging your holes now when the ground is softer and easier to work with. 

Sweet Pea is one of the great early crops to start from seed packets at this time. Early January is the best time to do that. Make sure they are in a frost-free area, and they’ll be ready for planting in March or April!

Turn the soil in your vegetable garden. The weather over the next few months will help to break it down and get it ready for planting in spring once the cold weather passes. 

Planning a Spring Garden

Planning a Spring Garden

Planning a spring garden is a great way to help you get through the dreary winter months. It may be too cold to start gardening, but there are still quite a few things you can do to make your life easier in the early spring. 

Before you start planning there are still a couple of outdoor tasks to take care of, so make sure you get to those first. 

Late fall and early winter are the perfect time to remove and discard diseased or bug-eaten plants from garden beds. Don’t toss them in the composting bin, however, as that can spread disease to plants the following season. 

Check and see if any plant roots are growing where they shouldn’t be, such as into your septic field or your foundation. Some roots can even buckle your driveway. Make a note of these and have them taken care of asap. 

Early winter is a good time to mulch overwintering plants and vegetables like carrots. Cleaning and storing your garden tools properly is also important so you have them ready for next year.

It’s always a good idea to check your grow zone to help you determine not only what the best plants are for your area, but also when to begin germinating seeds, and how long the plants growing season will be. 

Start creating a garden plan. Sketch out your garden area and plan where you’re going to put your vegetables, herbs, and flowers. Remember to leave room for the plants when they reach adult size so your garden isn’t too crowded!

Break out the seed catalogs. Ordering seeds from reputable companies will mean you get high-quality seeds with a high germination rate. Read up on germination times for each plant so you’ll know the perfect time to start indoor germination. Seed catalogs often contain gardening tips to get the most out of the seeds you order, so make a note of those.  

Check out your local garden center and pick up soil and extra mulch now, when it is often cheaper than in springtime. 

Decide where you’ll want to keep your summer flowers. These are usually going to be planted in pots, so a sunny patio or deck is a perfect home for these plants. You may also want to start shopping for decorative containers for these now, so you’re ready to go once they’re available. 

Finally, determine your goals for your entire yard overall. What do you want to get out of your yard? Are you looking to start a large landscaping project such as installing pathways, water features, and arbors, or do you just want to maintain your vegetable garden? Do you want to create a place for activities, or a calm Zen-like retreat? Working out your goals now will make it easier to create a realistic plan to execute come spring. 

By taking some time to do these things now you’ll be ready to get out there and garden the moment the ground thaws and the weather warms. Remember, a little planning can go a long way, so the sooner you start the more time you’ll have!

How a Warm Winter Affects Plants

For the past few years, Long Island has had relatively mild winter weather. While some people enjoy warmer weather in the middle of winter, for plants the fickleness of mother nature can be extremely confusing. 

During the cool season of fall, plants begin to enter dormancy. They are, for all intents and purposes, asleep. They do not put out new growth or take in many nutrients. However, when winter temperatures warm up for a long period of time (weeks instead of days) plants may break dormancy. 

When trees and shrubs break dormancy they may push out flower buds or new shoots for branches. This can be a problem when a cold snap comes and cold weather returns as those buds and branches will likely die off in the cold weather. Fruit trees in particular may have their spring fruiting ability affected by extremely cold weather after warm temperatures. 

Spring flowering plants may begin to push out of the ground early, breaking ground in early winter instead of spring with similar results as with trees and shrubs. 

Another issue that comes from a warmer winter is that harmful insects will not be killed off. Normally, during cold winters harmful insects and their eggs are killed off in great numbers with just a few surviving through until spring. These insects hide in tree bark, the grass of your lawn, leaf piles, the shingles on your house, and more. With a mild winter, there are more resources available for pests to consume, which means that there will be a lot more pests around. Bugs like cockroaches, mosquitoes, spiders, ticks, mites, moths, bees, and wasps can all benefit from a warmer winter. Bugs that burrow into trees may also be more active in a mild winter giving them more opportunity to cause damage. 

There is no good way to protect your plants from a fickle winter, but there is no need to worry as most of them will do just fine once spring comes around and the weather warms up normally. The best thing you can do is avoid heavy pruning in late summer and during the fall, as this triggers new growth that will likely be killed in the cold weather. Generally speaking, even if the cold kills off new growth and flowers the issue is only cosmetic and will resolve itself over the next growing season. 

Cutting Decorative Grasses

Ornamental grasses are one of the first plants to greet us come spring. You’ll see little green shoots coming up from the cut-off crowns and know that spring is finally really here. Decorative grasses can be warm season, cool season, or evergreen grasses. Warm season and cool season grasses are sometimes called “deciduous grasses”, meaning that the foliage of these types of grasses turn brown in the fall but tend to remain standing. These grasses when left as they are can provide winter interest to a landscape, particularly when they are in the background. 

While you can leave these grasses without care all year, they will tend to look more attractive if you cut back ornamental grasses in the forefront either in late fall or early spring. 

Cutting these grasses may seem like a difficult task, especially the kind with razor-edged leaves, but it doesn’t have to be. To cut back the grass, first, take twine or string and wrap it around the grass creating a sheaf. This will be easier to manage and cut through. Then, take your hedge shears—or for an easier job, a hedge trimmer or power hedger—and cut the grass about 4–6 inches above the crown of the plant. You want to protect the crown because it helps to insulate the roots through the winter, so don’t cut the grass at ground level. 

Once you’ve cut your grass plants down you’ll want to take the dead material and place it on the compost pile. Dead grass is a great way to get nitrogen into the soil, so it’ll help your compost pile do its job. If you happen to have a shredder you can also run the grass through it and make a great mulch for your other plants!

Remember, ornamental grasses grow not only tall but wide as well. Eventually, in addition to cutting them down, you may also need to split them so they stay manageable in your landscape layout. We’ll cover how to split grasses in a future post! In the meantime, find that string and get going on your trimming!

Call Us