Summer is here and that means spending a lot more time outside. Unfortunately, part of that time outside often includes bug bites, particularly mosquito bites. The Centers for Disease Control list mosquitoes as spreading a number of diseases from EEE (Eastern Equine Encephalitis), and Yellow fever to Zika virus and even—in other parts of the world—malaria.
Mosquitoes are attracted to the carbon dioxide that we exhale when we breathe.
So, unless you’re willing to hold your breath while outside the next best thing is to avoid getting bitten by using an EPA (Environmental Protection Agency) registered insect repellent containing one of the following ingredients:
DEET
Picaridin
IR3535
Oil of Lemon Eucalyptus (OLE)
Para-menthane-diol (PMD)
2-undecanone
All of these have been proven to be both safe and effective to repel mosquitoes when used properly and will help you to prevent mosquito bites.
The CDC also recommends preventative maintenance for mosquito control. This includes getting rid of or treating the breeding grounds that mosquitoes love. Any source of standing water from a plant saucer to a birdbath can become a place for mosquitoes to breed. If the water is necessary, such as a birdbath, treat it with a mosquito dunk. These are safe for birds and other wildlife but will kill any mosquito larvae and prevent eggs from hatching. All other sources of standing, untreated water should be dumped out.
The Centers for Disease Control and Prevention also suggest avoiding the outdoors at dawn and dusk. These times of day are the most active for mosquitoes. If you must be outdoors at these times use mosquito nets around your seating areas, or wear long-sleeved shirts to help reduce the number of bites you receive.
Finally, if you know you’ll be having an event in advance, it’s a good idea to have your yard treated for mosquitoes so that you and your guests can be worry-free. If you’d like to have your yard treated call Organically Green Horticultural Service and they’ll treat your yard so that your party can be as bite-free as possible.
There are a lot of reasons to plant native species when doing your outdoor plantings for both you and the wildlife around you. A native plant requires fewer fertilizers and pesticides than a non-native plant, which is great for the environment and for our local pollinators. Native plants are also already suitable for our fluctuating weather and can survive both our cold winters and hot steamy summers. Native trees are also uniquely suited to feed local herbivores and can handle the abuse better than non-native plants. In addition to all that, you’ll be more likely to attract butterflies to your yard.
When it comes to Long Island natives there are a lot of choices for native species to plant, so no matter what your landscaping needs you’re sure to find something to fit with your vision. From vines and perennials to ferns, trees, and shrubs, a naturalized yard uses less water and requires far less maintenance than those with exotic additions. Remember, these native plants have developed specifically to grow here over thousands of years so they need very little help from you to thrive. Some favorite perennials you may not realize are native are:
Trumpet vine
Columbine
Purple Coneflower
Yellow Coneflower
Black-eyed Susan
Blanket flowers
Creeping Phlox
Trees and shrubs include:
Arborvitae
Blue Spruce
Sweetbay Magnolia
Tulip Tree
Sweet Gum
A variety of oaks and maples
By choosing native plants for your landscape you’re helping to secure our ecological legacy, support local wildlife, and contribute to an improved environment. You’ll save water and use fewer chemicals to see your garden thrive. So the next time you’re out at a garden center looking for plants ask for plants that are native to Long Island. Give it a shot this season: go native!
Summer pruning of fruit trees is done both to increase next year’s crop and improve this year’s harvest. Most of the time pruning is done in winter when a tree is dormant, so pruning during the growing season may seem counterintuitive, but there are a few reasons to prune during this time of year.
Apples, pears, peaches, apricots, and cherries benefit the most from summer pruning.
Pruning fruit trees in summer controls undesirable growth and water sprouts. By trimming these off and pruning your tree you allow the fruit tree to put more energy into producing fruit than it does into producing branches.
Some stone fruits (apricots, peaches, and cherries) grow quickly, so after harvest, you should cut back about 50% of their new growth.
If you have young fruit trees, be careful to only prune a little bit at a time. The leaves you’re cutting off are your tree’s energy factory and they need them to grow strong. When you do prune, use that opportunity to shape the tree so that you can reach the fruit for eventual harvest. Dwarf fruit trees (which are most of the trees you’ll find in your local garden center) can be trained to grow into a number of shapes.
Finally, pruning your fruit trees allows more light to reach the fruits and will give them more air circulation. This can help deter pests and disease and make larger, sweeter fruit that is easy to reach.
As you look outside at your dormant lawn it’s hard to believe that in just a few weeks the pesky weeds will arrive. When the weather warms and plants wake up the weeds in your lawn wake up too. What most people don’t realize is that one of the best times for weed control is before they even start.
Weed seeds wait for the weather to warm before germinating. The best weed control product to handle this issue is called a pre-emergent herbicide. This type of weed preventer addresses weeds only, leaving lawn grass safely behind to grow. It is one of the best ways to get rid of perennial weeds. Crabgrass preventer is another type of pre-emergent herbicide; however, it can also be applied after weeds are visible. Pre-emergent herbicides are often mixed with lawn fertilizer, making spring lawn care even easier. This allows you to kill weeds at the same time as you feed your lawn.
Other types of weed control are called post-emergence herbicides. These get rid of weeds after they have appeared. This kind of weed control also handles all types of weeds including broadleaf weed species and grassy weed species. These fertilizers can be applied through the entire growing season to kill weeds; both annual weeds and perennial weeds are susceptible to this kind of treatment.
The long and the short of it is that staying on top of weeds with early treatment is easier than tackling a serious problem later in the season. If your lawn has only a few weeds here and there you might consider hand pulling, but once the problem gets too large a weed control product may be your only option. Remember that hand-pulled weeds can grow back and in some cases actually spread the seeds of the very weeds you’re trying to eliminate.
If you look online, you’ll find a lot of tips about how to remove a tick. Unfortunately, many of them, like painting the tick with petroleum jelly or nail polish, or holding a hot match to the tick is untrue, and can even be dangerous. This post will discuss the proper way to remove a tick and the best methods for caring for tick bites according to the CDC (Centers for Disease Control and Prevention).
The types of ticks you’ll find in our area most often are the Deer Tick (or the Black-legged Tick), the Dog Tick, or the Lone Star Tick. The former and the latter are known for spreading tick-borne diseases such as Lyme disease.
In the spring, summer, and fall months tick bites are common. The best way to handle a tick bite is with prevention—through the use of an effective insect repellent. However, if you do find a tick attached to you, the key—according to the Centers for Disease Control—is not to panic.
Even though ticks transmit disease, it does not necessarily mean that every bite will infect you. Once you notice a tick on you the most important thing is to remove the tick quickly and cleanly. Using fine-tipped tweezers grasp the tick as close to the skin as possible. Then, pull cleanly and carefully up and out, making sure not to break off the head and mouthparts. Remember, while ticks transmit disease through bites, leaving these parts behind can lead to infection in the skin.
After removing the tick carefully wash the bite site with soap and water and dispose of the tick by putting it in alcohol, placing it in a sealed bag/container, wrapping it tightly in tape, or flushing it down the toilet. Afterward, just keep an eye on the area. While having a small red bump from the bite is normal, if the redness extends out, becomes a bulls-eye rash, or if you have any other symptoms such as lethargy, headache, etc., you may want to seek out medical advice. A doctor can run blood tests to check if the tick has transmitted any diseases to you.
It is no secret that tick bites can spread diseases-Lyme at the forefront- to your family as well as your pets. What you may not know is that according to the CDC, they believe there are cases of Lyme, that go unreported as some are unaware they are infected. Aside from Lyme, there are also several other diseases that ticks can carry, a few include Ehrlichiosis-carried primarily by the Lone star tick-, Babesiosis and Rocky Mountain spotted fever.
Deer tick in questing pose. Credit: University of Maine
According to an article on the Veterinary Practice News website, a few of the reasons that tick populations have exploded is due to warmer winters, an increase in deer populations, birds carrying ticks to new areas, as well as the use of fewer insecticides. The article also states that in order to reduce the number of ticks the temperatures would have to be sustained at 10° F for a long period of time. Large amounts of snow also do nothing to eradicate these pests, instead, it acts as a blanket.
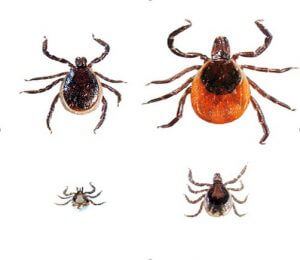
Deer tick life stages: Top left to right, Adult male, adult female; Bottom left to right, larvae, nymph Credit: www.tickencounter.org
Ticks are arachnids and related to spiders and mites. They have four life stages, egg, larvae, nymph, and adult. The three stages that feed on blood typically have a preference of host or size of their host and differ in their preferred environments. Most ticks also overwinter in the larval or nymph stage, and once the weather is favorable, they will begin immediately searching for a blood meal in order to advance to their next life stage. Some ticks also “quest” in order to find a host while others such as the Lone star tick will actively follow a host once it has sensed they are nearby. Questing involves the tick perching on vegetation (or structure) with its front legs extended in order to latch onto a passing host. Ticks can also sense the approach of a host through carbon dioxide, vibrations, etc.
On Long Island, we typically deal with three types of ticks, the deer (or black-legged tick), the Lone star tick and the American dog tick.
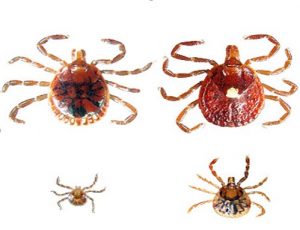
Lone Star tick life stages: Top left to right, Adult male, adult female; Bottom left to right, larvae, nymph Credit: www.tickencounter.org
The deer tick is the smallest of the three and is the primary vector of Lyme disease but also carries the Powassan virus, Babesiosis, Anaplasmosis.It prefers areas with moisture/ high humidity as they need to rehydrate their bodies frequently, making the edges of woodland or leaf litter, hot spots. White-tailed deer are the primary mode of dispersal for the adults, but it is believed that birds may aid in long-distance dispersal of immature life stages.
This tick passively quests or waits for a host to pass close enough so that they may attach themselves. According to the CDC, “Adult ticks may be out searching for a host any time winter temperatures are above freezing. All life stages bite humans, but nymphs and adult females are most commonly found on people.”
The Lone star tick, most commonly identified by the white dot on the female’s back, can transmit several diseases such as Ehrlichiosis, Tularemia, Heartland virus, and STARI (southern tick-associated rash illness). Alpha-gal syndrome (red meat allergy), has also been recently identified and is also associated with the bite of this tick.
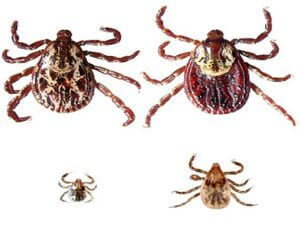
American Dog tick life stages: Top, left to right, Adult male, adult female; Bottom left to right, larvae, nymph Credit: www.tickencounter.org
The Lone star tick can be found in areas with tall grass or low-lying branches/twigs and unlike the deer tick, is very resistant to desiccation. Organically Green had the pleasure to hear Dr. Moses Cucura, of Suffolk County DPW, speak on these pests and from his own personal experience and research has found that they are capable of following prey for up to 60’. The adults are active anytime the weather is above 38°F and prefer large hosts (humans, turkey, deer, etc) at all life stages.
The final tick we are going to discuss is the American dog tick which transmits tularemia and Rocky Mountain Spotted Fever. Overall, the populations are spotty on Long Island but they require an environment with high humidity and can be found in old fields, brushy woodlands, and along roadsides.
The larvae prefer rodents such as groundhogs and will frequently be located around their burrows. The adults prefer medium to large hosts such as raccoons, dogs, cats, and humans.These ticks can survive at any given stage for two years if they are unable to locate a host.
Outside of taking the usual precautions—repellents (Permethrin clothing spray), checking yourself routinely, etc.—the CDC also recommends having a pesticide applied which can reduce the number of ticks by 68%-100%.
There are also a few cultural practices that can help reduce or discourage ticks:
Mowing
Widening/trimming of trails
Leaf litter removal
Gravel edge barriers
Mulch barriers—if it absorbs moisture, not effective
Canopy thinning (increase light penetration)
Knowledge of ticks, the diseases they carry, and ways to reduce their numbers can lead to early detection and treatment. If infected, reducing the chance of having long-term effects of tick-borne diseases.
We’ve just entered early spring and while it’s still pretty chilly most days a lot of us have turned our thoughts to spring gardening and the best spring flowers to plant to brighten up the yard. Flowers bloom at different times, so in this blog, we’ll cover some of the best plants for the early spring season.
The location of your garden bed will determine the best types of plants to place there. Do you have full sun or part shade? Take note of that before going over the following list of spring-blooming plants.
Creeping phlox is a wonderful addition to any spring garden and does well in all types of soil, so long as they are in full sun to partial shade. They produce a cascade of pretty white flowers, pink flowers, or lavender flowers depending on the plants chosen. Creeping phlox will come back year after year and will spread. They’re perfect for walls and rock gardens.
Lenten roses, or hellebores, are tolerant of partial and full shade. They come in a wide variety of colors including purple, red, yellow, green, and blue and are one of the more popular blooming perennials. They are relatively drought tolerant once established.
Daffodils, Hyacinths, Tulips, and Crocus are great spring bulbs to plant on the first day of spring. If you are looking for plants that have brightly colored flowers and are early to bloom they can’t be beaten. As a bonus, their uniquely shaped flowers attract bees and hummingbirds to your early spring garden.
Have a damp area to fill? Try the primrose. It comes in a variety of colors and is a wonderful early bloomer.
By planting these gorgeous bloomers your garden bed will be a riot of color and a welcome change from the drab winter weather.
Early spring is a great time for planting a fruit tree. In warmer climates fall planting may be preferred, however, harsh winters can damage young trees in harsher climates—particularly bare-root trees. Early spring is a good time because the root system of your newly planted tree will have time to establish itself all warm season long before having to handle the harsh winter.
Which Tree?
Stone fruit trees—including peaches, apricots, nectarines, cherries, and plums—are one of the easiest fruit trees to plant. They require very little care and need less pruning than some other fruit trees, such as apple trees. Dwarf or semi-dwarf trees may be an excellent choice for smaller yards. They are available for apple and cherry trees, but not yet for other varieties.
Digging the Site
Just before planting your fruit tree you should dig a hole that is slightly larger than the root ball. It’s important to dig the hole just before the time of planting, rather than far in advance because you don’t want the sides of the hole to compact. It’s important for the dirt to be loose and crumbly before putting the tree in. Some people suggest putting compost in the hole before you’ve planted the tree to give the roots a nutritional boost. After placing the tree in the hole backfill over the roots, making sure there are no air pockets around the rootstock (or base of the tree).
Tree Care
It is important to water in your newly planted tree. If the tree root dries out the tree can fail to thrive and even die. Fruit trees need sun for most of the day, so be sure to choose the correct location for your tree. While they may grow with less sun, they will not thrive and fruit as much as you may hope.
Diseases
Fruit trees are susceptible to a host of pests and diseases including winter moth caterpillar, peach scab, suckers, crown gall, cherry leaf spot disease, and fire blight. Care for these range from pesticides, antifungals, and antibiotic sprays to prevention by sterilizing pruning tools. Your local extension office or horticultural service such as Organically Green can help you to care for fruit trees and handle any issues that may arise.
Early spring, before the warm season really starts, is a good time to do a special kind of herbicide application known as a pre-emergent herbicide. Pre-emergent herbicide applications help to eliminate weeds before they can grow. Some of the common summer grassy weeds that this treatment can prevent are crabgrass, foxtail, goosegrass, and sandbur.
Once the soil temperature rises it will be the perfect time to apply a weed preventer. The correct temperature means that it should be 55 or above for at least 2 days. Usually, this is at some point between March and April.
For most granules or liquids are the two main methods used to apply pre and post-emergent herbicides. It is vital that the active ingredient reaches into the soil, so if you are using granules you’ll need to water them in. If you’re using a liquid, it will seep in on its own.
It is important to make sure you’re applying pre-emergents before the growing season because once weeds—such as crabgrass, or broadleaf weeds like dandelions, clover, ragweed, and carpetweed—are visible it’s too late and you’ll have to use different treatments such as a post-emergent herbicide weed killer. When using a post-emergent weed killer be careful during application because lawns and decorative plants can be burned or killed by these chemicals.
Apply pre-emergent herbicides in both late summer to early fall as well as early spring because this is when most weeds bloom. These pesticides have an active ingredient which does not stop weed seeds from germinating, but instead keep them from sprouting. This means that the application is best done just when the seeds germinate. This usually happens twice a year. For the fall application wait until temperatures drop to the mid-70’s for three to five days in a row.For some weeds, such as annual bluegrass, multiple applications over consecutive years may be necessary to achieve the level of control you’re looking for.
Pre-emergent herbicide applications will not last through consecutive seasons so it is necessary to apply them each year, twice a year, to get the weed control you want for your lawn.
The dark days of winter can be rough. Snow and cold can make almost anyone miss the verdant days of summer. Those of us that spend our spring and summer in the garden can really feel down when there’s nothing to tend to. If you just can’t wait to get your hands in the dirt, starting your seedlings early can give you a taste of the gardening you’re missing.
How to Start:
There are a couple of ways to start seedlings indoors. You can either grow plants from seed or buy seedlings that have already gotten their start indoors at a nursery. Watching seeds germinate can be extremely satisfying and will give you a little bit longer with the plant indoors, though buying pre-started plants is easier and sometimes more reliable.
Before you sow seeds check the date on your seed packet. Seeds have an expiration date and while they may germinate after this date, they will be less likely to do so. Most garden centers sell seeds of all kinds all year long, so you can begin to plant from seed at any time of the year.
To begin starting seeds you should place the seeds in a warm, dark, and moist area, such as between two damp paper towels on a set of plates. Keep them damp, but not soaking wet, and in a few days, you’ll see a root emerging from your seed. Once the root is exposed you can plant this seedling in the seed starting mix. When growing seeds indoors use peat pots to hold the soil, because once the outdoor growing season starts you can just plant them, pots and all, into the soil. This keeps the root systems from becoming damaged.
Keep Them Going:
Once your seeds are planted keep your eyes out for the first sprout they put out. You’ll see a tiny little set of leaves come up, and that will be the start of your new plant. Once you have seedlings growing you’ll want to keep them warm; if you are using natural light place them near a window. In the winter using natural light can become very cold so provide them with bottom heat by using a heat mat. If you are not keeping your seedling by a window consider using a grow light to help it along until spring. You should also make sure you give them plenty of air circulation to ensure that your new plants don’t succumb to fungal infections.
Time to Move:
When it’s time to move your plant outdoors you’ll need to decide whether you want to plant it into a larger pot or directly into the ground. Either way, you’ll need to “harden” the plant—meaning you’ll have to get it used to living outside. To do this, bring it outside for a few hours at a time for a few days. This will prevent shock and sunburn. If you plant in a container make sure it has drainage holes so that you don’t drown the plant. If you’ll be planting in the ground give the plant a little bit of compost to help it along and you’ll be harvesting in no time!

 here are also a few cultural practices that can help reduce or discourage ticks: